Autobound Product Guide
How to install Autobound, tweak your content drivers, invite your team, use us in other tools (i.e. Outreach, Linkedin), and more.
Key Topics Covered
- Intro to Autobound
- Signing Up and Getting Started
- Introduction to Sequencing with Autobound
- Coming soon:
Article Content
Everything you need to use, troubleshoot, and become an expert with Autobound. This product guide was written for all users, from those who signed up today, to seasoned organization admins.
Navigating this guide: Use the headers on the right side of the page to navigate to specific sections of the guide.
Intro to Autobound
Autobound is a sales acceleration AI-powered sales platform that increases email reply rate by generating personalized sales emails using AI, based on news events, shared experiences, persona-specific pain points, and more. Our AI scans through billions of prospect insights, then incorporates the most relevant into a compelling, persona-specific message. Autobound works in Gmail, LinkedIn, Outreach, Salesloft & any other sales tool in Chrome. Use our Web App and Chrome Extension to generate 1:1 messaging. Use our Bulk Personalization tool to generate personalized messaging in bulk. Check out Autobound API if you’d like to build your own AI writers powered by our technology.
We’ve trained our AI on millions of high performing sales emails to identify what content generates the most engagement. This takes the guesswork out of properly B2B prospecting guide with personalized messaging!
With a single click, Autobound generates a list of emails, email openers, LinkedIn connection requests, SMS, call scripts, or something custom, more that are proven to spark conversations.
Signing Up and Getting Started
Sign Up
Quick Start: Visit Autobound.ai and click "Sign Up Free". Fill in your basic details to create your account.
LinkedIn URL Confirmation
Provide your LinkedIn URL during setup. This enables Autobound to learn about you and your company, allowing the generation of personalized content instantly.
Confirm Company Confirmation
Confirm your company information, ensuring that Autobound accurately understands the business context and your role within the company.
Default Value Proposition Confirmation
Confirm the Default Value Proposition that Autobound generates. This proposition, crafted from information scraped from the internet and your company website, forms the baseline for content generation, outlining what your company does, the problems it solves, and the value it provides.
Offerings Confirmation
Validate the offerings, also known as the products or services your company provides. Include a unique selling proposition for each, enabling Autobound to generate compelling and specific content for each offering.
Buyer Persona Confirmation
Confirm the various buyer personas your company targets, along with specific value propositions tailored to each. This step is crucial as it allows Autobound to create targeted messaging that resonates with the specific needs, pain points, and values your company offers to these personas.
Install Chrome Extension
Install the Autobound Chrome Extension here to seamlessly integrate personalized content generation across your favorite sales tools, including LinkedIn, Outreach, Salesloft, and HubSpot.
Invite Colleagues
Invite your colleagues to join your Autobound organization. Any customization or personalization done within your account will be shared across your organization, enhancing team efficiency and consistency.
Maximizing Impact in Your First Week
Here’s how to get the most from Autobound in week 1!
- Install the Chrome Extension: Begin by installing Autobound's Chrome Extension to integrate seamlessly with your workflow.
- Watch the Interactive Onboarding Tour: Familiarize yourself with Autobound’s features and interface through our engaging onboarding tour.
- Book a Complimentary Onboarding Call: Schedule a personalized session to get tailored advice and insights on using Autobound effectively.
- Craft Your Default Value Proposition: Define and write a compelling default value proposition in Autobound to ensure consistency across your communications.
- Customize Your Writing Style: Tailor Autobound’s output to match your unique brand voice and style for more personalized outreach.
- Add/Update Buyer Personas: Input different buyer personas into Autobound to enable targeted and relevant communications for each segment.
- Upload Product Information in Sales Assets: Enrich your Autobound library by uploading key product information and materials.
- Experiment with Different Output Types: Try generating various types of content like emails, openers, and LinkedIn connection requests to see what works best.
- Use Autobound in Other Tools: Integrate and utilize Autobound within Outreach, Salesloft, Gmail, and other tools you use.
- Utilize Rewrite Buttons for Content: After creating content, use the rewrite buttons to adjust tone and length (shorter, longer, casual, etc.).
- Leverage Smart Enrich for Text Rewriting: Employ Smart Enrich to rewrite and enhance text, making it more personalized and effective.
Quick Wins and Best Practices
- Start Small and Scale: Begin with basic features and gradually explore more advanced functionalities.
- Regularly Update Your Buyer Personas: Keep your personas up-to-date for accurate and effective targeting.
- Monitor and Analyze Results: Keep track of your outreach’s performance and tweak your strategies accordingly.
- Engage with the Slack Community and Product Guide: Utilize Autobound’s community and this product guide for tips, advice, and best practices.
- Stay Curious and Experimental: Continuously explore new ways to use Autobound’s features for innovative engagement strategies.\
Navigating the Chrome Extension
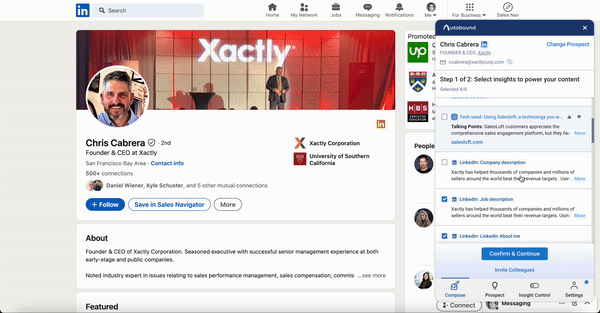
To follow along, open Autobound for Chrome while on a prospect's LinkedIn profile or from within Outreach or Salesloft. Click the Autobound icon on the right hand side of your screen or the Autobound icon next to a prospect’s LinkedIn URL or email (ensure you have the extension downloaded).
Overview of the Chrome Extension
The Autobound Chrome Extension transforms your workflow by adding a powerful sales tool. It integrates Autobound’s AI-driven personalization directly into your workflow, making it easier to generate and send personalized content without leaving your browser.
Integration with Sales Tools
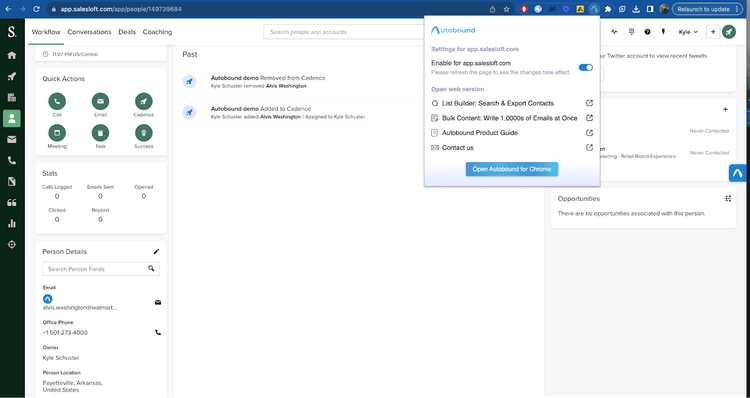
The extension is designed to work with a wide range of sales tools including LinkedIn, Outreach, Salesloft, HubSpot, and any other sales tool in Chrome. It nests neatly within these platforms, offering a streamlined experience for users. Within Salesloft and Gmail, the Autobound logo can be found within the compose tab of an email draft. Within Outreach, Autobound can be opened directly from the taskbar. Within LinkedIn and any other sales tool, Autobound can be opened by clicking the logo found next to any email address or LinkedIn URL.

Don’t like Autobound being injected across your various sales tools?
You can turn this functionality off by clicking the Autobound icon in your extension list in the top right corner of your chrome browser. Toggle off the option that says “enable for [website]”.
Interacting with the Chrome Extension
The Autobound Chrome Extension serves as a central hub for content generation and insight gathering, offering a Compose Tab for viewing insights and customizing content, a Prospect Tab powered by over 100 data sources for detailed prospect information, and Content Generation for crafting personalized content quickly. It seamlessly integrates with your sales tools to enhance workflow, provides customization settings for tailored functionality, and includes team collaboration for sharing insights and templates, fostering team consistency and collaboration.
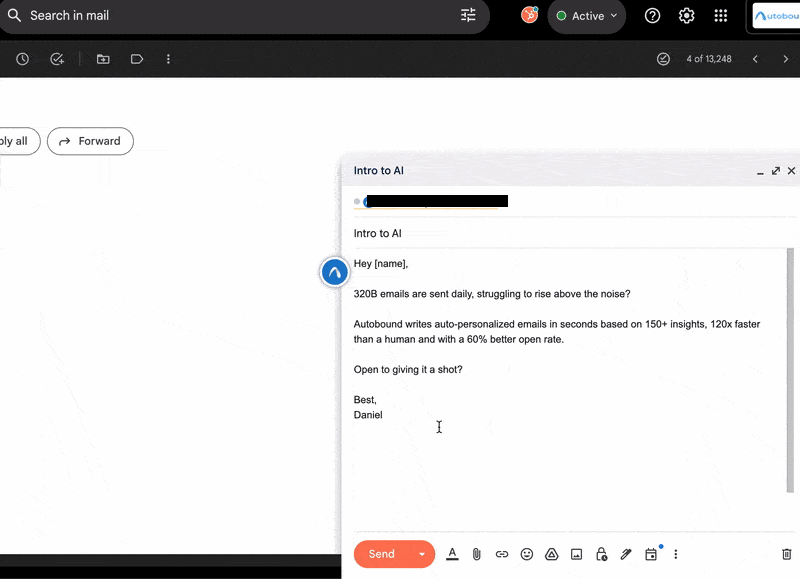
Generating content
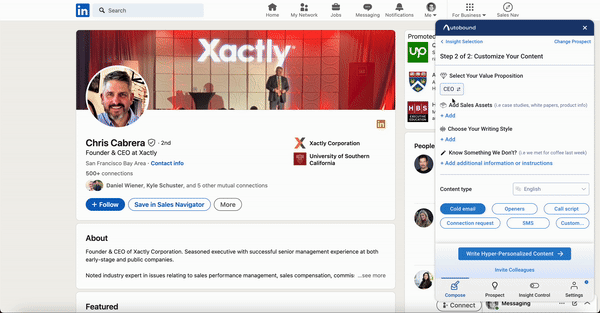
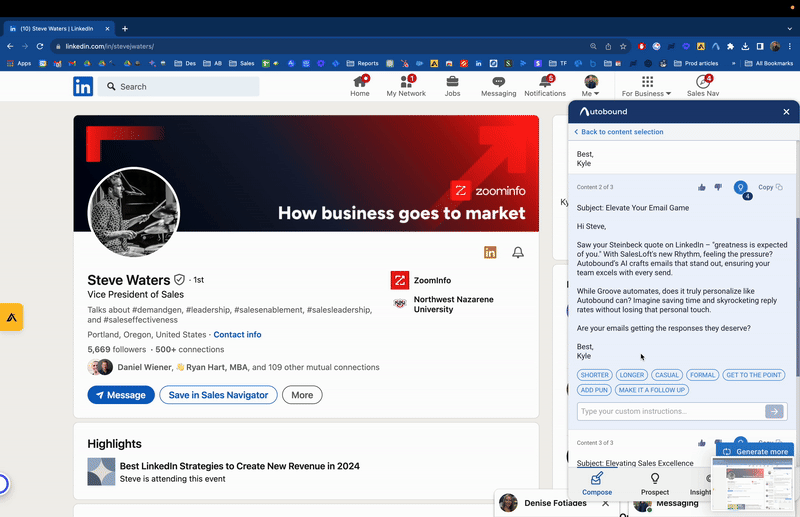
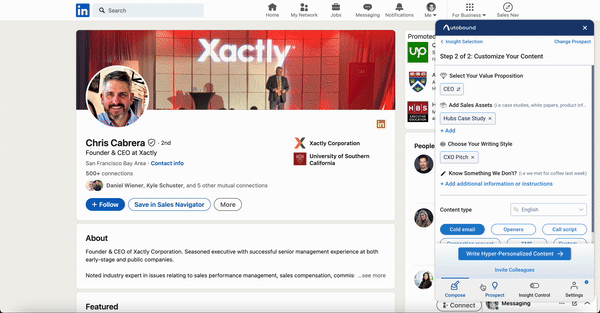
To generate personalized content, first open Autobound on a prospect. Autobound will show all of the insights available on that prospect. Select up to 8 insights to generate content (i.e. a mix of news events, competitor data, youtube/podcast appearances). Then, select a persona value proposition to make the content even more relevant. Add a sales asset to include a case study, or different product. Choose a writing style to match your own unique writing or a writing style suitable for your audience. Add any additional information you know about the prospect that you want included in the messaging. Finally, choose the language you want your output to be in.
After the content is generated, if you want to make changes, you can hover over one of the outputs and modify it by selecting from the buttons below the output to shorten it, lengthen it, make it more casual, and more. You can also type your own custom instructions on how you’d like it edited and you’ll enter a chat interface.
Learn how to set up Value propositions, writing styles, and sales assets below.
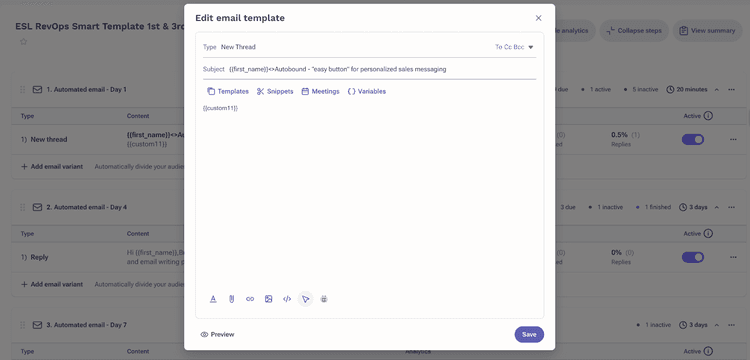
Introduction to Sequencing with Autobound
This section introduces the concept of Autobound's sequencing capabilities. It explains how integrating Autobound with Outreach and Salesloft can enhance sales outreach by automating and personalizing email sequences.
Benefit: Autobound's sequencing capability transforms sales outreach by allowing teams to rapidly leverage their existing sequences from Outreach and Salesloft. This integration means you can instantly import and enhance your sequences with AI-driven personalization, accelerating time to value remarkably. With Autobound, every email is precisely customized, yet teams have the flexibility to review and adjust in bulk before dispatch, ensuring each message hits the right note. This seamless blend of automation and control makes the sales process not only more efficient but also more impactful and engaging.
Watch this video tutorial to learn how to leverage Autobound sequencing.
Setting Up Sequences in Autobound
Step 1: Authentication
Connect your Outreach or Salesloft account within Autobound's settings.
Step 2: Creating a Sequence
To create a new AI sequence using Autobound, follow these steps:
- Go to Autobound's sequence page and click "Create new AI sequence."
- Next, you need to select an existing sequence from Outreach/Salesloft you want to clone and personalize. By leveraging the content in your sequence templates, Autobound can write personalized emails based on insights found on the prospect. Autobound will leverage the existing template message as a baseline when writing personalized emails throughout the sequence
- Choose which steps of the sequence you want Autobounf to personalize and Autobound will seamlessly weave in the personalized content. After saving your sequence, Autobound will import it into Outreach/Salesloft, and any step you asked Autobound to personalize will have the templates replaced with a {{customVariable}} that gets dynamically populated with personalized content.
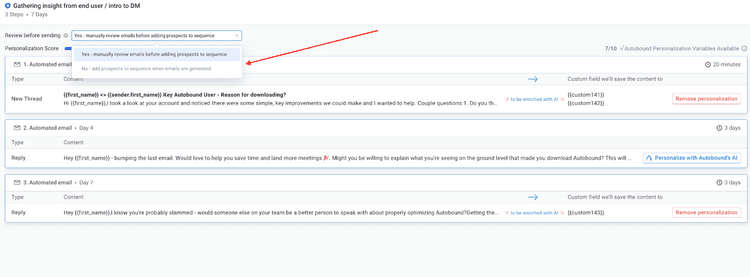
- Lastly, decide whether you want to review Autobound’s AI-generated content with Autobound’s web app or within Outreach/Salesloft by turning manual content review on/off.
Context:
When prospects are added to the sequence, Autobound will take 10-15 seconds for each contact to generate content. You have two options to proceed. First, you can review the content in Autobound's web app before pushing the prospect and content into Outreach/Salesloft. Second, you can let Autobound put the prospects in the sequence in Outreach/Salesloft once the content is done generating.
If you opt for the second option, you need to consider whether the email steps Autobound is personalizing are manual or automated email steps. If they are automated, users will never be able to review the content being sent out whenever prospects are added to the sequence. If they are manual email steps, users will have the option to review the content within Outreach or Salesloft just as they normally would with any manual email steps. They will see a task appear on their task list, and the content will already be personalized instead of a generic template when they open the task up.
Which should I choose?
Benefit option manual review on: This option allows the user to view each step of the sequence in a consolidated UI within Autobound. This allows them to see the insights powering the content, as well as edit the content before approving it. If you choose this option, it's recommended to make all email steps automated in your sequence. This is because the reps can review and approve the content in Autobound before pushing it into Outreach or Salesloft. Since they already reviewed it in Autobound, there's no need to review it again in Outreach or Salesloft.
Benefit of manual review off: The benefit of manual review off is that users can leverage their existing workflows more easily. If they don't have to wait for content to generate and review in Autobound, they can live inside Outreach/Salesloft and see a task popup in their task list once content is done generating. However, for a task to popup, the email steps in the sequence need to be manual rather than automated. Otherwise, the email will just send when the content is done generating without human review.

Step 3: Adding Prospects
Prospects can be imported from list or contact views in Outreach or Salesloft, streamlining the process of populating sequences. There are two options for adding prospects to sequences. One requires users to have the Chrome Extension installed, the other requires at least one Outreach/Salesloft Admin to be authenticated and connected to your Autobound org.
Option 1: Adding prospects via the new AI sequence button.
To use this option, you must have the Autobound Chrome extension installed. This method doesn't require an Outreach/Salesloft admin to be connected.
Whether you're starting in Salesloft or Outreach, you can initiate the process by selecting one or more prospects from the prospects tab and clicking the blue "AI Sequence" button.
You can also initiate this process in Salesforce. In Salesforce, you can select prospects and import them to Outreach/Saleloft. Then, you can select your prospects in Outreach/Salesloft and click the blue "AI sequence" button.
After selecting your prospects and clicking the AI sequence button, you'll be brought into Autobound's web app. From there, you can add prospects to a previously created Autobound sequence, which will be shown at the top of the list. If you want to create a new sequence, you can select a non-autobound-enabled sequence, which will guide you through the sequence creation flow before adding prospects to it.
Once a sequence is selected, you'll see a validation page where Autobound will notify you which prospects are eligible for content generation and which ones have issues. Once everything looks good, click "Generate Content" to initiate the content generation process. Depending on how many prospects you add and how many steps are personalized in the sequence, it may take 10-30 seconds per prospect. Keep in mind that each email generated consumes 2 credits. So, if a sequence has 3 personalized emails, each prospect will consume 6 credits upon successful generation.
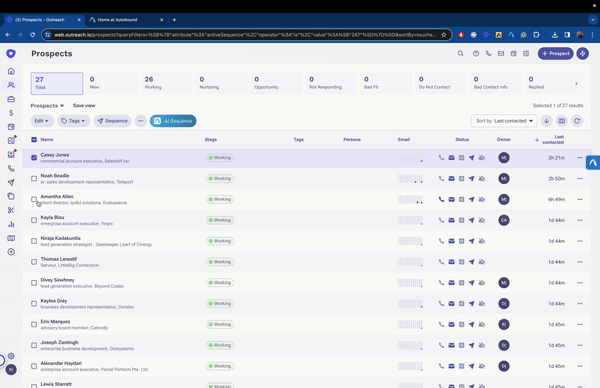
In the above example, I added prospects to a sequence without manual review, so that they would automatically enter the outreach sequence with personalized content. I also showed what the workflow would look like if manual review was enabled, where I clicked the "review new prospects" button.
How does manual review on/off come into play?
If manual review is turned on, you should refresh the page every 10-20 seconds until a new option to review prospects appears. However, if it is turned off, Autobound will automatically send contacts and content to Outreach/Salesloft when it's done. This way, you can easily review the content later.
If manual review is on:
Review and Adjustment of AI-Generated Content: Autobound offers an intuitive interface where users can review the AI-generated content for each prospect. This interface is user-friendly, allowing SDRs to easily navigate between different prospects and sequence steps. Prospects are sorted by the date they were added, with the most recent shown first. The first prospect is automatically selected for review.
Tweaking Content for Individual Prospects: The system enables users to edit and tweak content directly in the interface, ensuring each message is personalized and relevant. Autobound highlights the steps personalized with a distinct color for easy identification. Left and right arrows in the UI help users navigate between different steps or prospects efficiently.
Single Prospect Approval and Sequence Addition: Users have the functionality to add a single prospect to the sequence without needing to approve all prospects. The interface dynamically updates to reflect the number of prospects selected for addition to the sequence, and successful additions are confirmed with a visible indication.
Addressing Failed Prospects: Autobound also provides an option to view and address prospects for whom content couldn’t be generated. This feature is essential for maintaining the overall effectiveness of the sequence and ensuring no prospect is left unattended.
Option 2: Adding prospects to Autobound sequences just like you do normal sequences in outreach/salesloft.
Please note: In order to use this flow, an admin must connect Outreach or Salesloft to Autobound, and they must be part of the same organization as other users who wish to leverage this flow.
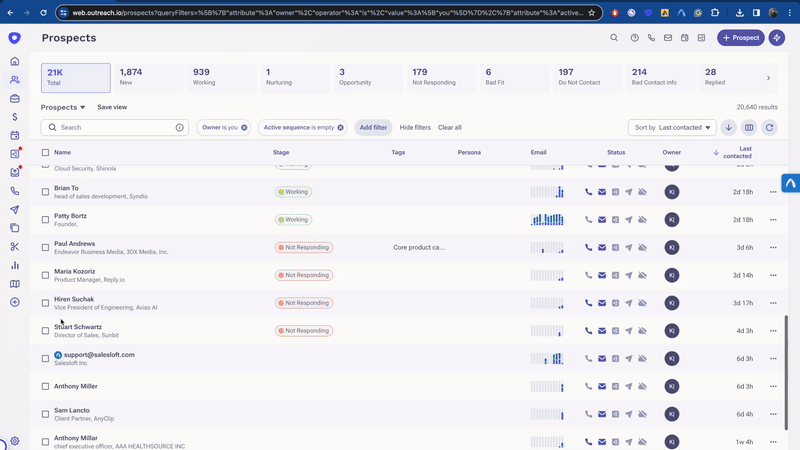
In the above example, notice how the prospect "fails" to enter the sequence? This is expected behavior. Autobound needs time to generate content. After 10-15 seconds the prospect will be successfully added to the sequence.
This flow is particularly useful if you add prospects to sequences via LinkedIn using a tool like Zoominfo or Apollo.io. However, you can also use this flow directly within Outreach and Salesloft. In either case, there are a few important things to keep in mind:
1) When an Autobound-enabled sequence is created in Outreach/Salesloft, any step that is personalized by Autobound will contain {{customvariables}} in the subject and body. This allows Autobound to dynamically fill personalized subject lines and bodies for each prospect added to the sequence.
Why does this matter?
For Outreach users:
If you try to add a prospect to a sequence in Outreach but the variables are empty, the activation will fail and you'll get a warning popup. Don't worry, this is expected behavior. Autobound will be notified of the failure and start generating content to fill those empty variables. Once the content is generated, Autobound will re-add the prospect to the sequence automatically and you'll be good to go.
For Salesloft users:
When you add prospects to a cadence with empty variables, it won't fail, unlike outreach. However, for manual emails, the variables will be empty temporarily. This is normal behavior, and you should allow Autobound 10-30 seconds to generate content for each prospect added to the cadence. It is recommended to use this workflow when you're adding multiple prospects to a cadence at once.
Why aren’t prospects generating content or making it into my sequences?
There may be several reasons for this:
- We can’t identify the prospect so therefore content fails to generate. If you have manual review on, you can check this under the “failed” tab when clicking into the sequence. You’ll also receive an email notifying you of this
- The prospect is already in an exclusive sequence and Outreach/Salesloft is blocking it
- The sequence ruleset/schedule is blocking the prospect’s task from activating.
Signal Data API
Turn these insights into pipeline
700+ real-time buying signals from 35+ sources. Know exactly when prospects are ready to buy.
Coming soon:
- The ability to rename sequences in Autobound
- The ability to edit the underlying templates being enriched by Autobound's ai within Autobound
- The ability to add prospects to sequences without Outreach/Salesloft
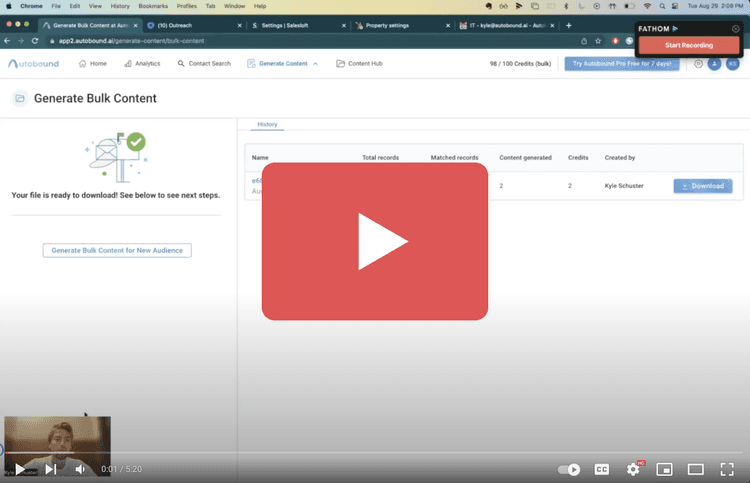
Bulk Content Generation Via CVS Export
Overview
Autobound's Bulk Content Generation allows for mass personalization of outreach emails. It dynamically generates a personalized email for each prospect by analyzing data across the web on the prospects you upload, ensuring your first point of contact is impactful and unique.
Here’s a video below you can watch that explains how to use it. You can also click through this interactive demo to learn how it works.
Setting Up Your Sales Engagement Tool for Autobound's Bulk Content Generation
Before diving into the utilization of Autobound's Bulk Content Generation, it's crucial to properly configure your sales engagement tool. This initial setup ensures that the personalized content generated by Autobound seamlessly integrates into your existing sales process.
Steps for Setting up Bulk Content Generation to Work With Your Sales Tools
Create a Custom Field in your Sales Engagement Tool
Navigate to the prospect level settings in your sales engagement tool.
Create a new custom field called {{autoboundContent}}. This field will be used by Autobound to import personalized emails for each prospect.
Here are a handful of help articles across various platforms that teach you how to do this:
Create a Template in Your Sequence Using Your New Custom Field
Ensure you have a template or an cold email templates guide that contains the custom variable Autobound needs to populate with personalized content for each prospect you add to the sequence. We recommend replacing the first email step in the sequence with the custom variable.
This new variable works the same as any other common variable you use in your sequences such as {{firstName}} that dynamically populates with text based on the data in the “First name” field on the prospect.
Admin Privileges
Typically, an admin or a user with advanced privileges will need to perform this setup. Ensure you have the necessary permissions or seek assistance from your admin.
Team-Wide Availability
Once set up, this configuration enables your entire team to leverage the power of Autobound's Bulk Content Generation, ensuring personalized outreach at scale.
Steps for Using Autobound's Bulk Content Generation After Setup
After setting up your sales engagement tool, you're ready to harness the power of Autobound's Bulk Content Generation feature. This innovative feature enables you to personalize outreach at scale, ensuring every prospect receives content tailored specifically to them. Steps on how you use it below.
If you haven’t already, watch the video below and take this interactive demo to better understand how to leverage bulk content generation.
Access the Feature
Go to Autobound's Bulk Content Generation page.
Upload Prospect List
Prepare and upload a CSV file containing your prospect list. Autobound requires a prospect's email or LinkedIn URL for each prospect to personalize the content effectively.
Autobound's Processing
Autobound will research each prospect, leveraging our vast dataset of prospect and company level insights.
After researching each prospect and their company, Autobound will generate a personalized email for each prospect, compiling the results into a CSV format.
Import Back into Your Sales Tool
Download the CSV file from Autobound.
Upload this file into your sales engagement tool (Outreach, Salesloft, HubSpot, etc.).
Ensure to map the column titled "Email 1 (html) UPLOAD THIS" to the corresponding custom field you created during the setup phase. This column contains the HTML version of the personalized emails, preserving formatting and paragraph breaks.
Adding Prospects to a Sequence that Contains the Custom Field (Referred to as a "Variable" when in Sequences)
When you add the prospects from the CSV to the Autobound enabled sequence in your sales tool, the system will dynamically populate the personalized email content for each prospect.
This process is similar to how standard variables (like first name, company name) are populated in your templates.
What Powers Autobound’s Content?
Overview of Prospect Insights
When you open the Autobound Chrome Extension, it instantly understands who you’re reaching out to (based on their email or Linkedin URL) and what is relevant to them and their company. Autobound leverages over 100 sources of personalization, ensuring that the content you generate is as relevant and engaging as possible. Here's a list of all the insights powering your content.
Key Features of Prospect Insights
Comprehensive Data Sources: The extension taps into a variety of data sources including LinkedIn profiles, current news, notable events, technographic data, YouTube, podcasts, and many more. This diverse range of sources ensures that the insights provided are rich, multifaceted, and up-to-date.
Automated Research: Autobound’s AI-driven system automatically researches and aggregates critical information about your prospects. This eliminates the need for manual research, saving valuable time and increasing productivity.
Content Generation: With the gathered data, users can generate various types of content tailored to the prospect. This includes:
- Cold Emails: Craft highly personalized emails that resonate with the prospect’s background, interests, and professional needs.
- Email Openers: Create engaging openers for your emails that grab the attention of your prospects immediately.
- Call Scripts: Develop customized call scripts that are informed by the prospect's profile, ensuring more productive and personalized conversations.
- Connection Requests: Send tailored connection requests on platforms like LinkedIn, making your initial interaction memorable and relevant.
- Custom Content: Generate other forms of custom content that are specifically designed to appeal to your prospect’s unique profile. Examples could include “a 4 step email sequence where the 2nd step is a poem” or “give me 5 interesting facts on PROSPECT and why they are relevant to me to help me prepare for a meeting”.
Signal Data API
Turn these insights into pipeline
700+ real-time buying signals from 35+ sources. Know exactly when prospects are ready to buy.
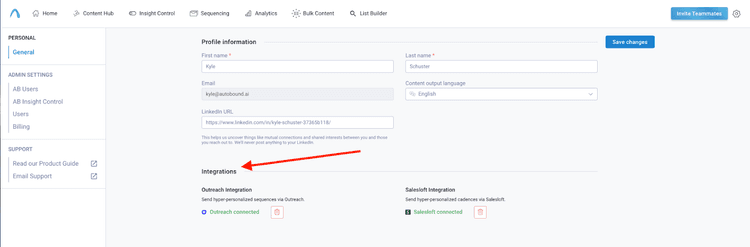
Integrations
Autobound Integrations Overview
Autobound seamlessly integrates with key sales tools to enhance your outreach capabilities:
- Native integrations with LinkedIn, Outreach, Salesloft, and Gmail, providing streamlined functionality within these platforms.
- Chrome Extension is compatible with nearly every sales tool in Chrome, including HubSpot, Salesforce, and Groove. The Chrome extension actively researches and understands your contacts, suggesting content that is personalized using relevant data.
Sales Workflow Recommendation
In most sales workflows, particularly within Outreach and Salesloft, Autobound excels in manual email steps built into cadences. Users can insert either openers or full emails into these steps, greatly simplifying the process of personalizing content at scale. We recommend integrating Autobound within manual email steps in your team’s sequences
Autobound Magic Enrich with AI
Autobound's 'Magic Enrich with AI' feature elevates AI email personalization at scale:
Autobound's Magic Enrich feature seamlessly integrates with sales tools in Chrome, allowing you to highlight text in email templates for instant, AI-driven personalization. It automatically researches prospects, ensuring that messages retain their original style and value proposition while becoming more relevant and engaging. This tool provides flexibility in messaging, offering quick and efficient ways to hyper-personalize content, thereby enhancing the effectiveness of your standard templates.
Organizations
Users can invite their teams into Autobound here.
To invite users into your org, go Settings -> Users -> New user
Organizations and User Roles in Autobound
In Autobound, organization structures and user roles are key to streamlining content personalization:
- Admins: Admins have the authority to manage the team's Default and Persona specific value propositions, and oversee billing. They play a pivotal role in curating and overseeing organization-wide content strategies.
- Managers: Managers can also manage the team's Default and Persona specific value propositions, ensuring that the sales messaging aligns with organizational goals and strategies.
- Members: Members are empowered to create personal Default and Persona specific value propositions, tailoring it to their individual sales approaches, but they cannot create or edit content for their team. They have permission to create and modify sales assets and writing styles.
The shared Content Hub is an important asset within organizations, allowing for team-wide content strategies. This is especially beneficial for sales leadership, as it ensures consistent, high-quality messaging across the team. By leveraging the Content Hub, Autobound ensures that the best possible messaging, tailored to specific buyer personas and their needs, is incorporated into every email, enhancing the effectiveness of sales communications.
Content Hub
Personalizing Content in Autobound's Content Hub
In Autobound, personalizing your sales content is made efficient and impactful through the Content Hub. Here’s how you can tailor your messaging:
Teaching Autobound your Default Value Proposition
During onboarding, you’ll be asked to confirm your default value proposition.
Autobound scrapes your website and other sources to generate this default value proposition. This usually isn't perfect, so a crucial step to getting the most out of Autobound is updating your Default Value Prop either during onboarding, or after the fact in your Content Hub.
When generating content, your Default Value Prop is used to understand what your company does, UNLESS, a Persona Specific Value Proposition is available to use.
Teaching Autobound the Buyer Personas you Target
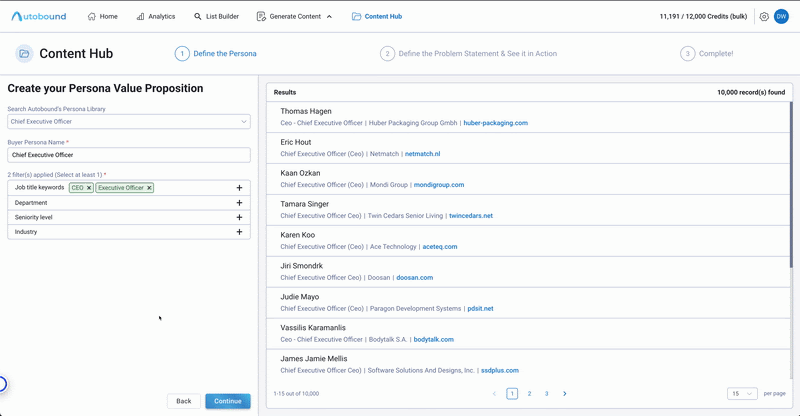
Creating Personas in Autobound's Content Hub
When you first sign up for Autobound, we will attempt to auto generate your Buyer personas and their associated Value propositions. You can modify and create new personas within Content Hub by following these steps:
1. In the Content Hub, select 'Persona Value Propositions' and then click 'Create New'.
2. Give your persona a general name that represents the job titles applicable to this persona, such as 'CEO'.
3. Include job titles that align with your persona value proposition. It's important not to overly restrict these filters. The goal is to allow Autobound to automatically select this persona when generating content for the associated job titles. We will use AI to determine which persona is the best match during content generation, but you always have the opportunity to modify this.
4. Autobound will initially attempt to generate a value prop for each persona using AI, based on what it knows about your company and the specific value it provides to this persona. This process ensures that the content is tailored and relevant to your targeted persona. We recommend editing this content, to ensure it uses your messaging, and is 100% accurate.
Personal or Team Value Props?
Personal Value Propositions only impact content suggested to YOU. They are prioritized over Team Value Props, so content can better fit your voice and style.
Team Value Propositions impact content suggested to EVERYONE in your organization. Only Managers and Admins can update Team Value Propositions. You should put your BEST messaging here, so new team members are set up for success.
Your team should invest heavily in perfecting your Value Propositions and building out your team Content Hub before letting users build Personal Value Props. It's important to get everyone on board with your core value propositions.
Sales Assets
Overview
Sales Assets in Autobound allows for the direct upload and integration of pivotal sales and marketing materials into the platform. This feature is designed to augment the personalization and impact of your sales emails by guiding the AI to include/ reference relevant resources like product descriptions, discounts, white papers, customer win stories and more.
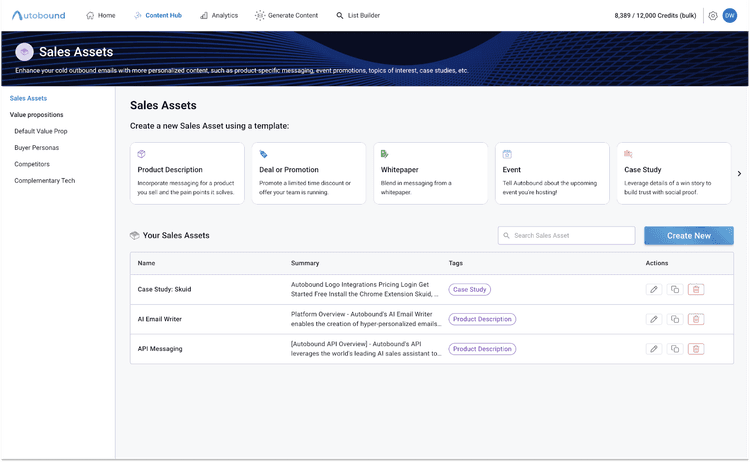
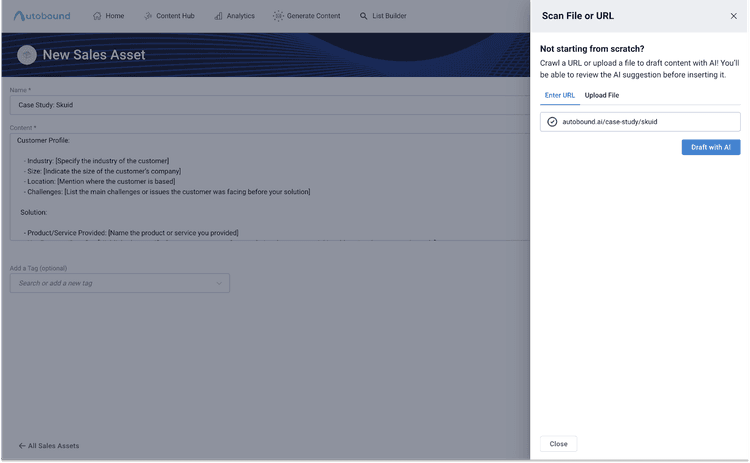
Creating Sales Assets
Accessing Sales Assets
Navigate to the Sales Assets section in Content hub
Choose from a template or create an asset from scratch. Enter a description of the asset manually, or you can upload files directly or input URLs linking to the assets. Autobound will scan the file or URL to extract relevant information.
Copy the content we generate and paste it in the description box.
Categorize and Tag
Assign categories or tags to your uploaded assets. This step is crucial for organizing your materials and making them easily retrievable.
Writing Style Customization
Autobound allows for deep customization of writing style to match your unique selling voice:
Choose from various pre-made writing styles, such as 'Data-Driven Style', or 'CXO Pitch” to align Autobound's output with your preferred communication approach.'
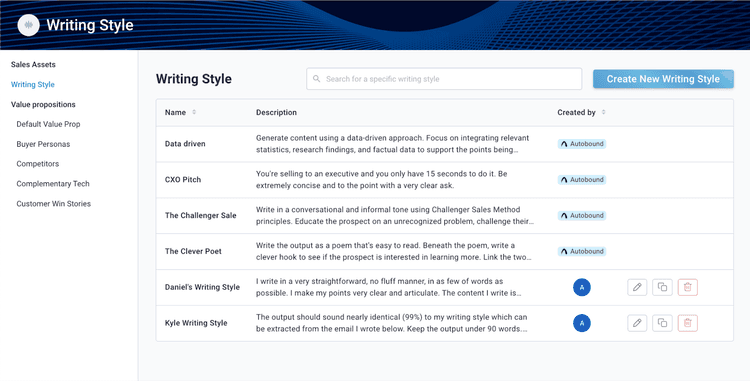
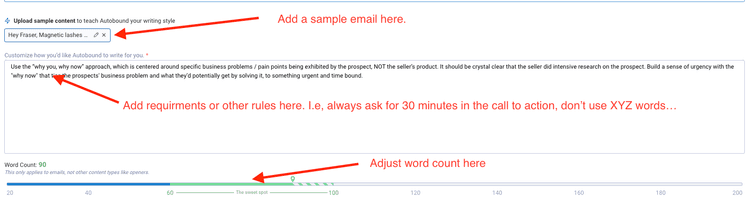
Create Your Own Style
For a more tailored experience, create a new writing style. Click 'Create New Writing Style', name it, describe your writing approach, provide an example email, and adjust your ideal word count. This helps Autobound learn and replicate your unique style.
This feature significantly enhances Autobound’s ability to understand your personal style and how you position your product, resulting in more authentic and effective sales communication.
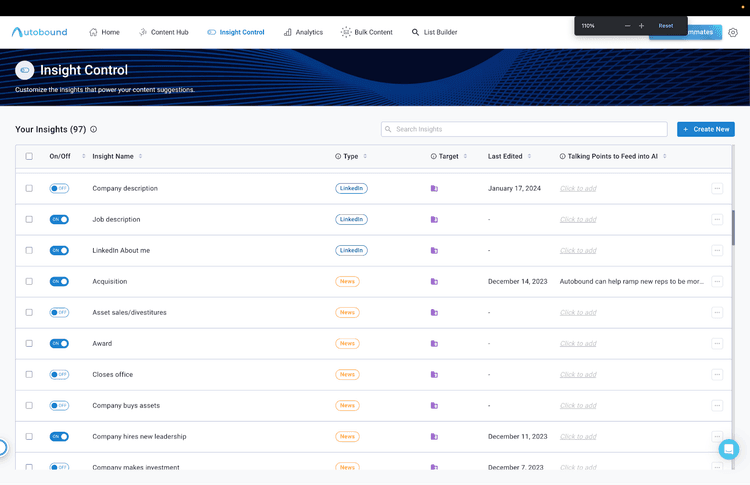
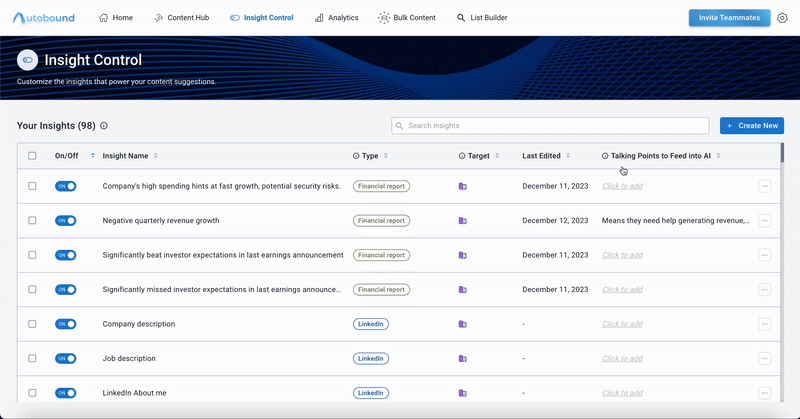
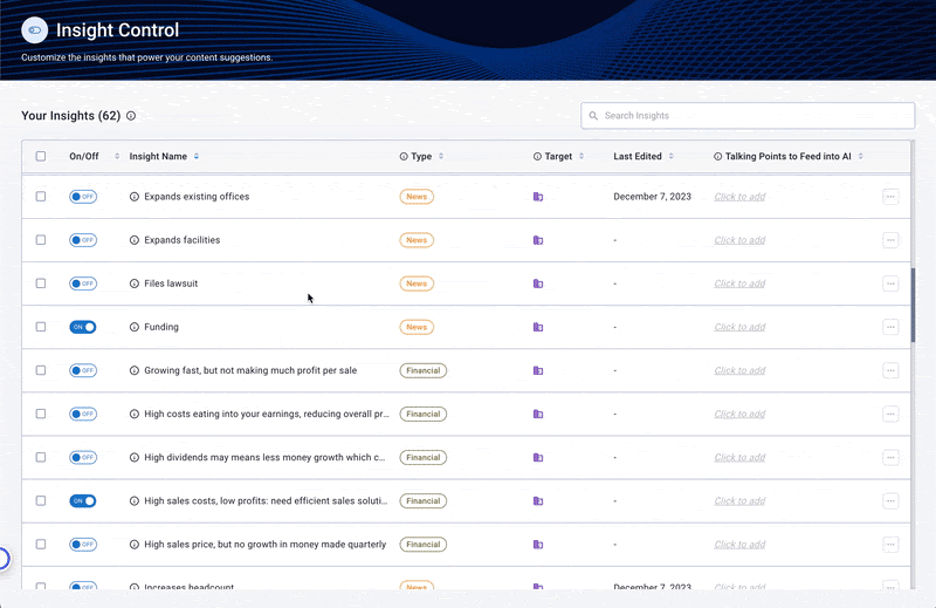
Insight Control
Autobound's Insight Control is a powerful feature that enhances content relevance and provides ultimate control over the insights that power your messaging.
Autobound's Insight Control allows for comprehensive tracking and customization of insights, enabling users to deactivate irrelevant insights for more targeted content. It offers the ability to refine data types powering your content and add key points to insights, ensuring they are effectively used to position your value and product.
Teaching Autobound the Technologies you Compete or Complement/Integrate With
A great way to customize your email is by referencing the technologies your potential customer is currently using. This can impact your value proposition and what you would like to highlight in your pitch.
Autobound gets this data from third party vendors. We know which products certain companies use by...
- Looking at their cookies and site data
- Looking for keywords in job openings
- Using machine learning to identify customer logos on company's "customer" pages
- Press releases, and more
Utilize the Insight Control Panel to build out profiles of your competitors and complementary technologies. Autobound actively monitors the technologies used by over 80 million companies. By defining your technology preferences, Autobound can alert you when a prospect uses these technologies, enabling you to craft messaging that effectively compares or complements these technologies in relation to your offerings.
By leveraging these personalization features in Autobound’s Content Hub, you can create more relevant and impactful emails, tailored to the specific needs of your prospects and aligned with your company’s unique value propositions.
Creating Competitors & Complementary Technologies in Autobound
To create Competitor/Complementary Technologies, click Insight Control>Create New> Select Competitor/Complementary Tech. Now, add their company url and talking points for your competitor/complementary tech-specific messaging. These “talking points” guide our AI in crafting content and help personalize the messaging for greater engagement and better response rates. When writing the “talking points”, be sure to be heavily focused on the pain points prospects using that competitor exhibit, and the benefit you're able to offer.
Talking Points
To ensure each insight is correctly referenced and relevantly used in messaging, it’s important to build “talking points” into each insight. This helps our AI better understand how you want to leverage the insight in your outreach. To create “talking points”, click “Click to Add Talking Points” next to the insight you wish to modify. Talking points can be up to 2000 characters in length.
Enabling/Disabling Insights
To enable an insight, simply toggle the switch adjacent to the insight to the 'On' position. By doing this, you grant Autobound the permission to weave this specific insight into the content, but only when it aligns with the prospect's profile or situation. Conversely, if you wish to prevent an insight from being utilized in content generation, toggle the switch to the 'Off' position. This action instructs Autobound to omit the insight, ensuring the generated content remains pertinent and tailored, without the influence of the disabled insight. These controls offer a nuanced way to refine the personalization of your outreach, ensuring that every piece of content is as relevant and impactful as possible.
How Pricing Works
Credit Consumption and Content Generation Using the Chrome Extension
Every free user is provided with five daily credits that reset 24 hours every day from the point they signed up. Credits are consumed when you generate content for a prospect. Pro users have unlimited content credits to use in the chrome extension.
Note: Chrome extension Credits are different from Bulk Credits. Chrome Extension Credits are shown within the Chrome Extension. Bulk Credits are used for Bulk Personalization and can be viewed under Bulk Content.
Bulk Content Credits
Autobound's Bulk Content Credits system is designed to streamline the usage and tracking of resources when generating content in bulk. Bulk content credits are shared across the organization. Here's how the credits work and how you can manage them:
Credit Consumption
In the Bulk Content Generator, credits are consumed based on the type of content generated:
- Emails consume 2 credits each.
- Openers (introductory content) consume 1 credit each.
Conditional Credit Consumption
Autobound ensures efficiency and fairness in credit usage. If the system cannot generate content for a specific prospect, no credits will be consumed for that instance. This ensures you only use credits when valuable content is successfully generated.
Allocation and Purchase of Credits
Initial Credit Allocation
Both Free and Pro users receive a set number of Bulk Content Credits upon starting. This initial allocation allows users to immediately start leveraging the Bulk Content Generator. Inviting new users to join your organization does not add additional bulk content credits to the organization’s credit pool.
Additional Credit Purchase
Should you require more credits, additional Bulk Content Credits can be purchased directly within the billing section of Autobound. This flexibility ensures that your content generation efforts can scale in line with your outreach needs.
Upcoming Features and Credit Usage
Full Sequence Generation: Autobound plans to introduce a feature that allows users to generate full sequences that integrate seamlessly with sales automation tools like Outreach and Salesloft.
In this upcoming feature, each email in the sequence will consume 2 credits, aligning with the current credit consumption model for emails.
Credit and Subscription Management
In the billing portal, you'll find details regarding your plan including the plan name, number of users, credits included (or if you're on the unlimited plan), and the total cost per month or year. The portal will also display your credit usage details including the usage period, amount used, and the reset date.
Upgrading Your Plan
If you find that you require more than five credits per day, you have the option to upgrade to Autobound Pro and unlock unlimited credits. Simply navigate to the plan selection page within the billing portal and choose Autobound Pro. You can then proceed to the payment page to finalize your upgrade.
User Management and Shared Billing
Pricing is based on the number of active users or "seats" on your account. You can add or remove seats as necessary. New users added to your organization will automatically be assigned the same plan as existing users.
Note: We have a 20 seat minimum for enterprise plans
As an admin, you have the power to assign a seat to a user, thus taking over the billing for that user. The cost for that user will be added to your account, and their previous billing will be erased. If you remove a user from your billing account, the adjustment will be reflected in the next billing period, decreasing your total cost.
When you purchase a new seat, you'll be immediately charged a prorated amount for the rest of the current month. From the start of the next month, you'll be billed the full price for the increased number of seats.
Inviting a Paying Users to Join Your Paid Organization
Individual users who were previously paying for an account will have their personal plan deactivated when invited to join a paid organization. They will now be part of the organization's billing plan.
Billing Overview and Control
In the billing portal, you can see a clear overview of the plan you're about to purchase, with detailed information about the total cost, billing frequency, and the amount due at the time of purchase.
You can also edit your payment information, view the list of users you're paying for, and see how much you're spending in the current period from within the billing portal.
Should you ever need to cancel your subscription, there's a straightforward method to do so within the billing portal.
Lastly, it's important to know that users can join an organization without shared billing setup and still pay individually, providing flexibility for diverse team setups.
FAQ
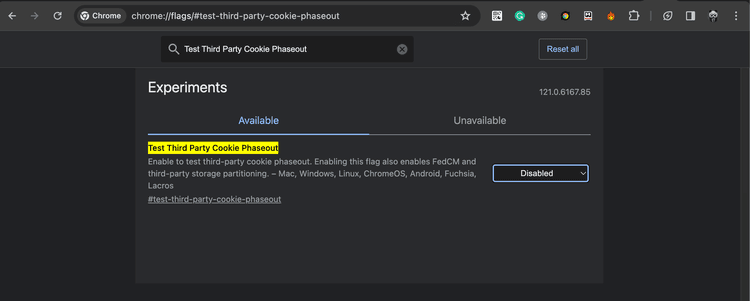
Q: Why can't I log into Autobound's extension even though I have the correct username and password?
Answer: Google is testing out some new features that is impacting a small subset of our users. Let me know if none of the below solutions work.
Please try taking to following actions:
Workaround 1: Need to disable the Feature Flag from Google.
- Go to the link chrome://flags/#test-third-party-cookie-phaseout and make sure that FF is disabled, not enabled (need to restart the browser after making changes).
- After that, need to try logging into our extension again.
Workaround 2 (if the previous one didn’t help): The user can manually allow Third-Party cookies for specific domains where the user wants to use our extension.
So, to allow that need to follow these steps:
- Click on the Tracking protection item if it exists
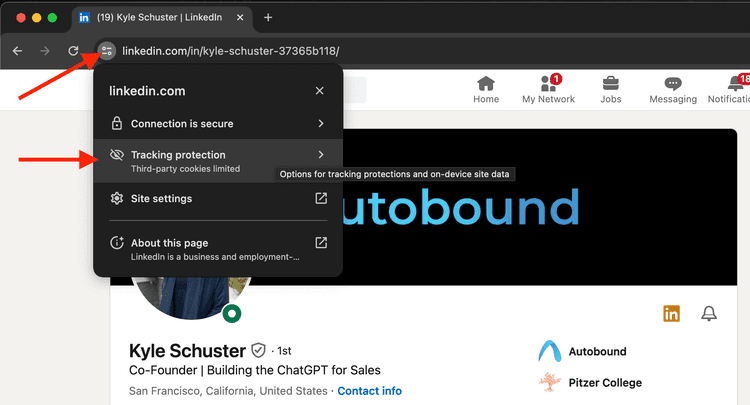
2. Click on the checkbox to allow third-party cookies for the current site
3. Try logging into our extension again.
Workaround 3 (if the previous ones didn’t help):
1. If you don't see "Tracking protection" item in the dropdown.
Please go to this link (chrome://settings/cookies) and make sure you have allowed third-party cookies.
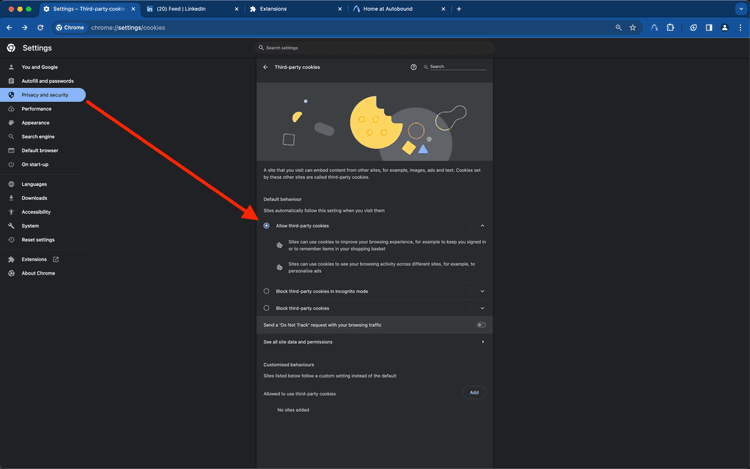
2. Try logging into our extension again.
Related Signals
See live buying signals related to this topic — updated in real-time from 35+ data sources.
Job Changes
The #1 buying trigger — new roles mean new vendor evaluations
Explore signal →
Hiring Signals
Growing teams signal budget and urgency to buy
Explore signal →
Funding Rounds
Recently funded companies are actively purchasing
Explore signal →
700+ signal types across 35+ categories
Browse all signals →Related Articles
Intent Without the Black Box: We Backtested a Signal-Native Buying Predictor
We backtested a signal-native intent engine on 82.8M signals and real outcomes. It flagged future software buyers at up to 7.6x the accuracy of random targeting.
What's New at Autobound Signal API — June 2026
Self-serve credits, unlimited intent exports, company scoring, better errors, and faster performance. Here's what's new at Autobound Signal API.
Top Buying Signal Platforms for B2B Teams in 2026
Compare the top buying signal platforms for B2B sales teams in 2026. See how platforms like 6sense, ZoomInfo, Demandbase, and Autobound stack up on cove...
Explore Signal Data
35+ data sources. 250M+ contacts. 50M+ companies. Talk to our team about signal data for your use case.